Friday, February 21, 2014

Brazing Rack Mounts

Did some rack braze-ons last weekend. It was a little tough because I used MAPP gas and it took a awhile to get to brazing temperature. There was a sweet spot temperature that was hard to get to without burning off too much of the flux. The biggest solution came when I was taking flux from other parts of the assembly and moving it into the area I was working on. I practiced a bunch on a piece of scrap chrome-Molly and felt comfortable enough trying it on the bike.


Getting the parts hot enough for the silver to flow when I had the parts clamped together was a challenge. Once I put a tack weld of silver solder on and could remove the clamp the silver flowed OK. I don't think I will win any awards for the looks of my brazing but the mounts are on very solid.


Tuesday, February 4, 2014

February Update

I have done a little work on the bike since the last post but I hope to be getting some things done in the next couple of months. I moved in November and have been busy setting up the house and my new bike workshop. Here is a picture of the bike after a nice gravel ride around the new neighborhood. It rides great but still needs work.


After a slightly sloppy gravel road ride

New updates include:

Brazed on new cable stops on the top tube
Brazed on cantilever post on the seat stays
Brazed on a brake bridge (Need to put a new one on one day as this on is too small)
Put lower geared chain rings on up front (46 and 34 tooth front chain rings)
Put on new drop bars and brake levers
Put on a new 350mm steerer tube fork

Tuesday, November 12, 2013

Schwinn update

I threw on some old 700C wheels with roughly 31cm wide tires (temp sizing wheels), put on Shimano clipless pedals and repacked the bearings on the axles and bottom bracket.


It is looking and riding better...


Monday, November 11, 2013

Seat and seat post finished

I finished the seat and seat post install yesterday.

First I drilled out the relief hole in the seat tube slot.
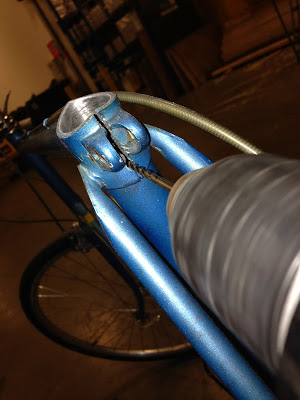

Widening the seat tube relief hole
Then I cleaned up the inside of the seat tube using a flex hone. I bought the hone from Jegs.com and it was about $8. It worked really well.

I also used a wire wheel to the seat post bindings as they had a bunch of surface rust. After that I sprayed it with some primer.
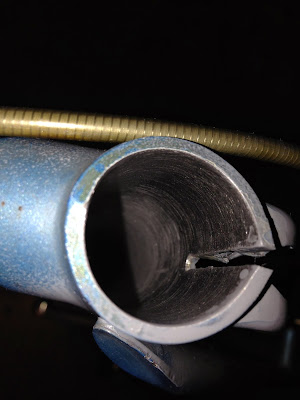
It is much shinier in there then the photo shows
 
A little primer to keep the rust a bay
 

When I put the new seat post in it was still too tight and it got a little scrapped up. I took a large screw driver and put it in to the slot and widened the gap a bit. That did the trick and it slid in no problem.

I cut a bit off of the new seat post and grinded down the edges and put a liberal coating of grease on it. Not that I am worried about weight on this project but I thought it would be fun to cut the seat post then clean the edges up.

I then put in an actual seat post binder bolt vs. the junk drawer bolt that was in there.
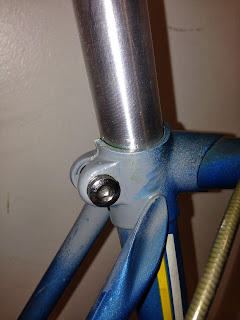
$5 seat post binder bolt


Here is the finished results.


I did 12 miles on it today when I rode to a friends house. I was very comfortable, much better than the old Schwinn/Viscount seat that was on it.

Sunday, November 10, 2013

Seat & seat post

The first official upgrade is going to be my seat and seat post.

I would have liked to use the original seat post but it is only 200mm tall. Not tall enough for me. I bought a 300mm seat post in the right 26.4mm diameter. But before I put it in I want to clean out the seat tube. I was not sure why but the original seat post is gouged up pretty bad. I took a file to the edge of the seat tube to clean it up but I did not see anything that would have caused the scratches. I am going to use a flex hone to clean it out before I put the new post in.

Old post


I also noticed that the seat tube slot does not have much of a strain relief hole at the end of it. I am debating whether I drill one in before I do the honing. The hole usually reduces the occurrence of cracks from the base of the binder slot.


The seat I am going to use is a Specialized Toupe that I had on one of my other bikes. It's a great seat and very light. It might be a bit under padded for gravel but the top is thin and it flexes pretty good which makes it more comfortable than it looks.

And lastly I have to add a true binder bolt.

Thursday, October 31, 2013

First commute

I did my first commute on the new (old) bike last week. This is what I had waiting for me at 6:45AM on Halloween!

Yup, dark.


Not scary at all. Actually the scariest thing about the ride is the sound of big truck air brakes hissing behind me!
Here comes the sun

 The gravel was in great shape. It was packed pretty good and almost like asphalt with a few washboard sections here and there. The ride was 13 miles each way. It is not a bad commute. I saw a handful of deer and a bat that was on the ground. Not sure what he was doing there but pretty cool.

The bike rode really well. Actually, I am pretty surprised at how well this old bike rides. The issues are minor. The seat was pointing too far down in the front and as a result I kept pushing myself up with the handle bars. That is a quick fix. The only other issue is that the gears are pretty steep! Best fix there is to strengthen my legs...

Of course I have plenty of upgrades to do but it is pretty fun riding as is for now.

Wednesday, October 30, 2013

1" threadless 350mmm steerer tube fork

I found a great fork for my project the other day. It is pretty much perfect. The steer tube is 1" and threadless but the great part is that it is 350mm long. It should allow plenty of stem height adjustment. It is also made with curved lower legs that will give it a stock look. I particularly like the gussets on the inside of the fork legs.

- Tange Infinity CrMo
- Lugged flat crown
- Cantilever bosses
- 44mm rake
- Axle to crown: 389mm
- Double set of dropout eyelets
- Low rider pannier mounts
- Chrome-plated
- Extra long 350mm steerer
-Available in threadless 1" or 1- 1/8"